Total Pageviews

Monday, August 29, 2011

from the book "Grow It, Cook It......*

When Life Gives you Lemons....................
 ......make lemon ice pops!!
If you are lucky enough to live in a part of the world that grows lemon trees, you may be able to pick them from your own backyard.  We went to Arizona one year for Thanksgiving at my brother's home and they had a bounty of lemons from their own tree! (Thanks, John and Shan!) We made lemonade, lemon mousse pie, lemon french toast, etc.  


Here in Seattle, I get my lemons from the produce section of the market.


Try this cool, zingy recipe from the book Grow It, Cook It:  Simple Gardening Projects and Delicious Recipes, from DK Publishing.


Here's What You Need:


6 juicy lemons
1 cup honey
3 cups cold water
18 small, empty yogurt cups (save 'em up!) or small Dixie paper cups


Here's What You Do:


*Put the honey in a saucepan and finely grate the zest from 3 of the lemons--add the zest and 2 cups of water to the honey.  Bring to a boil over medium heat while stirring, then remove from heat.
*Squeeze the juice from all of the lemons--should be about 1 cup.
*Strain the honey and lemon zest solution through a strainer into a bowl.  Add the lemon juice a bit at a time.  Stir and taste--keep adding lemon juice to your taste. 
*Put the lemon mixture in the fridge to cool.
*Add the last cup of water when the mixture is cool and stir well.
*Pour into the empty yogurt containers and freeze until firm but not solid.
*Insert a popsicle stick into each container in the middle.  Freeze until solid.
*Enjoy while cooling off on a summer day!


Cheater Version:


*Make cold lemonade from frozen concentrate.  Pour into containers and freeze until firm. Insert the sticks and freeze until solid. Lots quicker, but then again--"it's the process, not the product!"


*Check out the book!  


Saturday, August 27, 2011

Watercolor Spirals........

When the paint on the paper plate is dry, start cutting a one inch strip around and around on the plate in a spiral shape.....
Use watercolors or other paints; fingers or brushes to cover the surface of a thin paper plate.

.....until you reach the very center of the plate.


Now your water-colored spiral is ready to decorate any space by hanging it from the ceiling!

Friday, August 26, 2011

Ocean in a Bottle

Waves of color.....

Here's What You Need:

*clear plastic bottle with cap
*water
*food coloring
*vegetable oil or baby oil
*masking tape

Here's What you Do:

Fill the bottle about 1/3 full with tap water.  Add some food coloring--blue to make "ocean waves."

Fill the rest of the bottle up with oil.  Screw the cap on securely and tape with masking tape.

Swirl the bottle and notice the results!  Give it a good shaking and the substances will seem to combine for awhile.

Why?

Water mixes with many things, but not oil!  When you put them together in the same container they remain separate.  This makes them insoluble.  If you shake the bottle they seem to combine for awhile, because the oil breaks up into tiny oil globs and is suspended in the water temporarily--in this state it is called an emulsion. As the bottle sits, the two substances completely separate again.  

Take it Further:

If you remove the masking tape and add a bit of sand to the bottle, it will sink to the bottom--because it has more density than the water or oil.  You can experiment by adding different material to the bottle and asking your child what they think will happen.  What happens if you add a styrofoam peanut? Will is sink or float--which is more dense? What about a rock?  

Thursday, August 25, 2011

Spaghetti Sculpture--Mama Mia!

Sofie contemplates her mobile sculpted from spaghetti. When it's dry, she can peel it off the wax paper and hang it from the ceiling.


Here's What You Need:

cooked spaghetti, cooled
white glue
tempera paint
small bowls for different colors
forks for mixing each color
wax paper
tape
CJ and Sofie select colors for their sculptures


Here's What You Do:

For each color, mix 1 tablespoon white glue with 1 tablespoon of paint.  Add one cup of cooked noodles and stir well to coat.
Tape a large piece of wax paper to the table.  The artist arranges strands of colored spaghetti in any design--make sure the pieces are overlapped and touching.  It helps to have paper towels around so the artist can wipe hands off between colors. When the sculpture is finished, put it in a safe place to dry--one to two days, or more depending on thickness.
  

When it is dry, carefully peel it from the wax paper.  For a colorful display, tie ribbon or yarn to one end and hang it from the ceiling like a mobile.


Wednesday, August 24, 2011

Egg head friends

*
Fast growing grass seeds give 
your friends a good hair day.....

...you can also use a flower pot, a paper cup or any other sort of container.


Here's What You Need:
*empty egg shells or
*flower pot, paper cups, etc.
*empty toilet paper roll, cut into rings as a base for the egg shells.
*Potting soil, or soil from your garden
*grass seeds
*markers or craft materials to create "faces"


Here's What You Do:
*Next time you cook with eggs, break them near the top of one end (to give as much container space as possible) and rinse them.
*Let your little gardener decorate the egg shells or containers to create faces for their "friends." If you are using egg shells, make a stand for each one by cutting rings for an empty toilet paper roll. Place each shell on a stand.
*Your child can scoop potting soil into each egg shell or flower pot.  
*Moisten the soil and scatter grass seeds in a thick layer on top. Place another very thin layer of soil on top of the seeds and moisten again.  (a spray bottle works well for watering--it will help your child avoid over watering).
*Give your friends a nice home in a sunny place like a windowsill, spray their heads with water daily, and watch for the seeds to sprout! Within a few days you'll see some green fuzz appear.


Monday, August 22, 2011

Marshmallow Tower


This open-ended building project works very well for preschoolers using colorful bendy straws or tinker toys as connectors......
....as well as for older students studying mathematics and engineering.  Try using dry fettucine or spaghetti as connectors for bigger kids.


Here's What You Need:


Marshmallows (stale ones actually work best!--but fresh will do) try different sizes and you may even be able to find colorful fruit-flavored ones.


Straws, bendy or other, colorful or plain. The sticks from Tinker Toys work, too!


Blunt scissors to cut the straws to different lengths.


Dry fettucini or spaghetti for older kids.


Lots of imagination!


Here's What You Do:


Let your kids build it any which way they want to!  Try to avoid the temptation to step in and help them or try to "make it look like something."  Creativity and confidence will be unleashed the more the children do projects independently.  My mantra is:  "it's the process, not the product!" Helping spark ideas is fine, of course.  One pre-school boy loved firefighters, so his mom suggested building a fire station.  (she let him do the actual building though.)  He spent hours constructing it and bringing in his action figure firefighters to work in the building!


Sunday, August 21, 2011

Magical Fireflies....

Scroll down for a related poem and activity to enrich your reading of the book.

In the inside cover, the author, Eric Carle tells us that The Very Lonely Firefly is the 4th book in his VERY quartet and it is about belonging. "We all want to belong to a group, a family, our own fellow creatures."

The first book in the VERY quartet, and probably the most familiar is The Very Hungry Caterpillar, with the theme of hope.

The second book is The Very Busy Spider, and is focused on our need for work.

The third is The Very Quiet Cricket, about the universal search for love.

HOPE.....WORK.......LOVE......and BELONGING


Firefly

A little light is going by,
Is going up to see the sky,
A little light with wings.
I never could have thought of it,
To have a little bug all lit
And made to go on wings.

(Elizabeth Madox Roberts)


Firefly Craft

You can make your very own Fireflies. This is an easy and fun summer craft, suitable for toddlers on up!


Ages: 2 and Up 


Here's What You Need...
• Black construction paper
• White paint
• Paper plate or shallow dish
• Shiny, metallic pipe cleaners
• Wire cutters or sharp scissors
• Glue 

Here's What You Do:
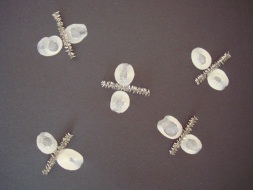
1. Pour some white paint into a paper plate or shallow dish. Make white thumb prints on your black paper, to look like wings of a firefly. Make a bunch of them all over your paper!
2. Cut your shiny pipe cleaners into small pieces to make the body of your bugs. Glue them in place and you're done! 
*from Busy Bee Kids Crafts

Saturday, August 20, 2011

Mini-Pizzas: Design Your Own

English muffins--
(disguised as pizzas)

They are quick, easy, delicious and everyone gets to pick his or her own toppings.  Happy Day!

Here's What You Need:

*English muffins, split in half (the whole grain muffins are wonderful)
*Pizza sauce in a squeeze bottle, left-over spaghetti sauce--canned or home-made.
*Mozzarella cheese, grated---other kinds of cheese are tasty, too.
*variety of toppings--whatever you have and your child likes: olives, tomatoes, green peppers, mushrooms, cooked chicken, pepperoni, ham, pineapple--the possibilities are limitless.

Here's What You Do:

Preheat the oven to 375 degrees.  Let your little one split the English muffin with a table knife--it's the perfect time to practice cutting as the muffins are mostly pre-split. Give each child a plate with half a muffin.  Let them spread the tomato sauce on top and then sprinkle the grated cheese.  Decorate with selected toppings.  Place the "pizzas" on a cookie sheet in the hot oven until cheese is melted.  Take from the oven and let cool for a few minutes. Enjoy a satisfying lunch together!

Warning--the song on the link below will get stuck in your head! (but it's fun)


Pizza Round - By Cherry Carl
(Sung to: Row Your Boat)

Roll, roll, roll the dough.
Toss it in the air!
Pepperoni, cheese and sauce,
There’s enough to share!


Thursday, August 18, 2011

Flower Power--Bath Salts and......

This post is dedicated to Judy and her granddaughters!

The bees love lavender and so do I!  Here's a way to capture some beautiful scents of summer and use them as gifts for the bath. Go for a walk with your young ones and harvest herbs and flowers that are the most fragrant: mint, lavender, rose, sage, lily-of-the-valley, and honeysuckle to name a few.

Here's What You Need:

Fragrant flowers or herbs
a few drops of floral essential oil, if desired
3 cups sea salt
large bowl
1-quart jar with a tight-fitting lid

Here's What You Do:

*Break the flowers and herbs into medium-sized pieces.  If you are using essential oil, add a few drops to the sea salt and let your little one mix it up by hand in a large bowl

*Pour a 1-inch layer of the salt into the jar, then add a 1-inch layer of the petals and leaves.  Add another 1-inch layer of salt, then the flowers, and alternate layers this way until the jar is filled.

*Place the lid snuggly on the jar and set in a cool, dark place until the salt absorbs the fragrance from the plants--about 3 weeks (patience required!) You can check your jar every few days and enjoy a sniff or two while you wait.

* When enough time has passed, open the jar, strain the plant material from the salt with a colander, and place the salt in a jar with a lid.  

* When you're ready for a delightful bath, pour 1 cup of the salts into your tub water and enjoy.


Here's another project from the garden that takes some waiting, but not as much....


Fill an ice cube tray half full of water.  Have your little one gently place petals from edible flowers like pansies, nasturtiums, and lavender so that they are floating in each cube. (look up any other plant to make sure it isn't harmful) Freeze until hard.  Fill the tray with water to the top and freeze again.  Now your decorative ice cubes are ready to make any drink more charming!


Tuesday, August 16, 2011

What You Can Do With Broken Crayons.....

This is a soothing, satisfying art technique--the crayons glide across the paper.  You can try several variations and see what works best for you and your child. This activity is best for children over age three.


Here's What You Need:
Warming tray, such as an electric pancake griddle, with low setting.
Foil
Peeled crayons
Different kinds of paper


Here's What You Do: 
*Cover the tray with foil--set temperature to low or medium-low. Supervision is needed so your child takes care with the heat. Show your artist how to hold an end of the crayon so fingers don't come in contact with the heat.
*Use crayons to draw directly on the foil.  When you are finished, press a piece of paper on the design and set aside to dry.  Wipe off foil with a paper towel for the next artist.
*Variation:  tape the corners of paper to the foil and make your design directly on the paper. Try other "canvas" such as fabric, paper plates, etc.


Chunky Rainbow Crayons


Preheat the oven to 350 degrees.  Peel crayons  and fill each muffin tin with the colors of your choice. Place the muffin tin in the oven and turn if OFF. Check every few minutes.  When the crayons look soupy, take them out of the oven, and if you have room in your freezer--freeze for half an hour.  Otherwise, wait overnight.  The colorful wax will harden into chunks of crayon just the right size for little hands. When they are ready, carefully pop them out of the pan and you're all set for some rainbow art!


Monday, August 15, 2011

¡Flubber Fantastico!

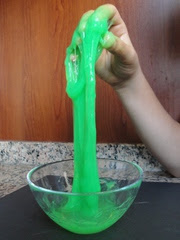
It's a classic!  And I'm sure it must account for at least 97% of sales for Borax. What could be more fun than smooshing and dripping this flexible goop? It's something in between a solid and a liquid.

Here's what you need:  

1 teaspoon borax (in the laundry section)
1 cup water
1 small bowl
a small bowl or cup for each child
spoon, or popsicle sticks for stirring (per child)
2 tablespoons white glue (per child)
food coloring

Here's What You Do:

*Measure the borax and the water into one of the bowls and your child can stir with a spoon or popsicle stick until the borax is dissolved.
*In each child's separate bowl, measure the white glue and add a few drops of food coloring.
*Add 1 tablespoon of the borax and water mixture to the colored glue mixture and have your child stir well.  Magic happens here!
*Take the mixture out of the bowl and knead it in your hands.

What Happened?

You have just created a type of plastic! The molecules in plastics are made up of long chains of molecules called polymers. When these polymer chains are joined they become very strong.  Some plastics are hard, like a bike helmet--or very soft and pliable--like your flubber. 

Basic Science Vocabulary: 


Molecule: the smallest part of a substance that has all the properties of the substance.
Dissolve: one substance, (such as borax breaking apart) and going into another substance, (such as the water) and making a solution.
Chemical Reaction: when two or more chemicals (in this experiment the water, glue and borax) are combined and the combination creates a new substance.

Polymer:  a plastic substance made up of long chains of molecules.


Sunday, August 14, 2011

Solar Power--Create a Sun Print :)


Young artists can capture the energy of the sun by making a sun print!  Craft stores sell kits and paper, but you can also use construction paper--dark colors work best. 


All you need is a sunny day, (sometimes hard to come by here in Seattle) dark construction paper, and some imagination in choosing objects to "print".  Take your time wandering the yard and selecting interestingly shaped leaves, flower blossoms, mushrooms, rocks, small branches, pinecones.....

Place the paper down in a sunny spot--late morning or after so the sun is high in the sky. Arrange the chosen objects on the paper in any design you like. If it's a breezy day, you may need to secure the paper with tape on the back, or rocks to hold the corners.  Leave the paper and the natural items in place for several hours.  The sun will fade the construction paper, but leave a silhouette of where each object protected it from the sun. You can frame your creation, or fold it to make notecards.


Saturday, August 13, 2011

Scrumptious Smoothies!


While at the library the other day, I plucked a fun cookbook off the shelf--Kid's Cook 1-2-3, by Rozanne Gold. There are over 125 recipes, all made with only three ingredients!

Here are two recipes in the book sure to become family favorites around here! These refreshing smoothies are perfect for a summer morning breakfast or snack. It is an excellent team project—your little chef can add ingredients to the blender; the grown-up handles the appliance. 


Blueberry-Banana Smoothie

 serves 2

1 cup frozen blueberries  (freeze fresh ones if in season)
1 very ripe banana (I freeze them when they are getting too ripe to eat fresh, and then use them in smoothies)
8 ounces vanilla yogurt

Put the frozen blueberries in the blender.  Slice the banana, or break the frozen one up and add it to the blender.  Add the yogurt, 8 ice cubes and ¼ cup cold water.  Process on high until smooth, thick and creamy.  Add a little more water if it’s too thick.


Strawberry-Coconut Smoothie
serves 2

8 ounces ripe strawberries  (plus two berries for garnish, if you wish)
1 cup light coconut milk
2 ½ tablespoons sugar

Wash berries and pat dry.  Remove the stems and cut into thick slices.  You should have one cup of packed strawberries.

Put all the berries, coconut milk, and sugar into the blender along with 8 large ice cubes.  Blend until mixture is smooth and thick.  Serve immediately in 2 chilled glasses or refrigerate until very cold.  The mixture will thicken as it chills.

Garnish each serving with a whole strawberry.


By Rozanne Gold--check it out!


Wednesday, August 10, 2011

Salt Crystal Observation...watch them grow!

  Pipe cleaner salt crystal designs.

Materials:

pipe cleaners
clear cup or jam jar
1/2 cup hot water (Be careful! Adult helps with this part)
1/3 cup salt
spoon
pencil string
food coloring (optional)

  • Bend a pipe cleaner into any shape you like.
  • Carefully pour the very hot water into the clear cup (1/2 cup per cup). Add a few drops of food coloring if desired.
  • Mix in 1/3 cup salt just one spoonful at a time--stir and dissolve after each spoonful.  Keep adding salt until no more will dissolve.
  • Wrap one end of the pipe cleaner around the middle of a pencil.
  • Set the pencil across the top of the cup.  Make sure that the pipe cleaner hangs down into the salty, hot water.

  • Place your crystal growing cup into a place where it will not be disturbed and where you'll be able to check on it often.
  • You'll have to be patient!  It will take a few hours for the signs of the growing crystals to show up on the pipe cleaner.
  • Observe the crystals and see how they change each day.  When most of the solution is evaporated from the cup, remove the pipe cleaner and slide it off the pencil.  You can tie it to a piece of yarn and use it as a beautiful, sparkly ornament.

Did you know that before the salt in your salt shaker is ground into tiny little specks it actually looks like this?  
This is a large crystal 
chunk of salt

How did the experiment work?

When you dissolve the salt into the hot water, the tiny salt crystal molecules are spread apart and are mixed up with the water.  As the water evaporates, the salt molecules line up in a regular pattern to become a crystal again, clinging to the pipe cleaner.

Basic Science Vocabulary:

Molecule: the smallest part of a substance that has all the properties of the substance.
Dissolve: one substance, (such as salt molecules breaking apart) and going into another substance, (such as the water) and making a solution.
Evaporate:  the process of a liquid changing into a gas. 
Crystal:  a substance in which the molecules are packed into a orderly, three-dimensional pattern. Most crystals are solids---salt and sugar are both good examples of crystals.

adapted from Science Arts by MaryAnn F. Kohl and Jean Potter

Tuesday, August 9, 2011

A Little Science, at Snacktime......

Dancing Raisins Experiment

Materials:

tap water
clear glass, jar, or plastic cup
several raisins
spoon
2 tablespoons baking soda
2 tablespoons vinegar

Fill the cup 3/4 of the way with water. Drop the raisins into the cup. Stir the baking soda into the water until it is dissolved.  (This is a great time for your young scientist to practice measuring because the quantities don't have to be as exact as for baking) Now add the vinegar and watch what happens!

You've just created a chemical reaction--which gives the raisins energy to dance!  In the plain water, the raisins sink to the bottom, because they are heavier than the liquid.  When the baking soda is added and dissolved, the raisins still stay at the bottom.  But, when you add the vinegar, the solution creates carbon dioxide gas.  When the gas bubbles bump into the raisins, they attach to the outside of the raisins and help them float to the surface.  The combination of a carbon dioxide gas bubble and a raisin is lighter weight than the water, so they rise to the top.  When the bubble pops, the raisin floats back down to the bottom again.
And there you have it--dancing raisins!

Basic Science Vocabulary


liquid: One of the three states of matter: a substance that flows, rather than a solid or a gas.
chemical reaction: When two or more chemicals (substances--in this experiment the baking soda and vinegar) are combined and the combination creates a new substance.
carbon dioxide:  gas composed of carbon and oxygen.
energy: ability to do work (like dancing!)


Monday, August 8, 2011

Fingerpaint Artistes: create a true Messterpiece!

The most simple and easy fingerpaint mess-cipes:

Materials:

Jug of liquid starch
Powdered or liquid tempera paint
Glossy fingerpaint paper, or other shiny paper works best, but you can use anything.

Make sure your artist is wearing old clothes, or covers his or her clothing.  This is a messy project!

Pour a small puddle of liquid starch into the center of the paper.  Add a squirt of liquid tempera, or sprinkle a spoonful of the powdered tempera into the starch. Let your artist mix and spread the paint all over the paper by hand.  When the paper is covered, make designs with fingers, (elbows and arms work, too).

Some children really do not want to get their hands dirty—if this is the case, you can also make designs with a brush or any interesting object.

Move the finished artwork to a drying area covered with newspaper.


Shaving cream fingerpainting…….

All you need is a can of shaving cream, a tray or a cookie sheet and some kids who want to have fun!

Squirt a few mounds of shaving cream onto a surface, and let your artists smear to their hearts’ content!  (wearing paint shirts or aprons is a good idea, too.)